Yes, you read that right. My friend Amy and I are going to make something for Christmas every month in 2011! It's going to be fun!
Our first draft list, in no particular order, includes:
felt hand puppets of the Nativity
a tree skirt
Christmas/winter playdresses for our girls
Advent calendars
handmade Christmas cards
dining room table stuff - runner, napkin rings, placemats, etc.
Nativity blocks
a felt garland of some sort of Christmas motif - lights, holly leaves, whatever
plan and compile materials for a whole month of crafting with kids (I was unsuccessful at doing this impromptu)
Okay, that's 9. Any more ideas? I suppose we should stop the list at 11 - January through November - and spend next December NOT working on the projects so we can enjoy the fun of doing crafts with our kiddos and baking! Mmmm ... baking ... I did not do nearly enough to appease myself this year. (Durned teething in my poor baby's mouth.)
No, we haven't decided what we're doing for January yet - I'll post it when we do. Anyone care to join us?
27 December 2010

26 December 2010
Christmas crafts
We've been having a holly jolly Christmas with making some cute holiday crafts between watching Disney Christmas cartoons over and over and over, and eating Clementine oranges nonstop. We've made:
- a Nativity from coloring pages found HERE and cardboard rolls. We used the middle of wrapping paper rolls. You could also use the cardboard from paper towels or toilet paper.

- wrapping paper for presents going to cousins. We used packing paper that we still have stashed from our move almost 2 years ago (yes, we had THAT MUCH paper). I used cookie cutters as stencils and drew the shapes with markers, and the girls colored them and used foam Christmas stickers that I got at the dollar store.


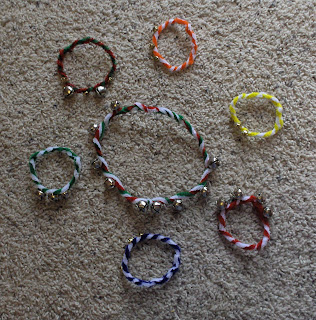
- jingle bell bracelets described HERE with little bells and pipe cleaners. When the girls were done playing with them, I hung them on the tree. They make cute little ornaments.
- paper cone Christmas trees made from construction paper and decorated with markers and the foam Christmas stickers. I got the idea from a book, but HERE is a template and directions to make pretty much the same thing. The difference from the book is that our half-circles were folded into pie-shaped fourths and folded into a three-sided tree (with the fourth side being a full overlap for gluing together) rather than being round. My girls decided they were party hats rather than trees.

- a Nativity from coloring pages found HERE and cardboard rolls. We used the middle of wrapping paper rolls. You could also use the cardboard from paper towels or toilet paper.

- wrapping paper for presents going to cousins. We used packing paper that we still have stashed from our move almost 2 years ago (yes, we had THAT MUCH paper). I used cookie cutters as stencils and drew the shapes with markers, and the girls colored them and used foam Christmas stickers that I got at the dollar store.


- jingle bell bracelets described HERE with little bells and pipe cleaners. When the girls were done playing with them, I hung them on the tree. They make cute little ornaments.

- paper cone Christmas trees made from construction paper and decorated with markers and the foam Christmas stickers. I got the idea from a book, but HERE is a template and directions to make pretty much the same thing. The difference from the book is that our half-circles were folded into pie-shaped fourths and folded into a three-sided tree (with the fourth side being a full overlap for gluing together) rather than being round. My girls decided they were party hats rather than trees.

our Christmas dinner
Friends, this dinner was noteworthy. Nirvana on a plate. Adam's a good cook but seriously. When it comes to Mediterranean food, something just really comes together for us.
We skipped the typical turkey and mashed potatoes for Christmas dinner, and went with a Lebanese theme.
We had roast using this meat rub that we used on lamb at Easter. We were told by a friend that we could use roast if lamb is too expensive - and it was this time - and it worked spectacularly. Adam cooked it in the crockpot and it was very juicy and fell apart when cut into. The smell in our kitchen was amazing.
Adam made pita bread using this recipe - it didn't work out so well as the first time. The rolls were not hollow. So we tore out the middle and used the bread chunks in our dips, and voila! The shell is a regular pita pocket! For our pita appetizers, we had tomato, cucumber, green olives, black olives, strips of bell pepper, goat cheese, hummus, and an eggplant dip called baba gannouj. If you are a fan of hummus, may I suggest a replacement. Baba gannouj is absolutely delicious, not to mention hilarious to say. 8000 times. Baba gah-NOOSH! It was, by far, one of the most casual and relaxed and FUN meals we have had in a long time.
We also had, but hardly worth mentioning after all that, asparagus with lemon and rice.
And then dessert. Please join me in singing the Hallelujah Chorus. We have a new Christmas dessert at our house: Buche de Noel. It's a French cake shaped to be like a yule log - it's a flat, flourless cake with mousse rolled in the middle and covering it over the top, and it's all chocolate.

the most amazing dessert EVER!
09 December 2010
Paint

As long as Trina is painting I'll tell you about my latest painting adventures:
Although we have three kids I have never set up a "nursery" we lived in such dives or were so broke that it was just never an option.
Finally - now that my oldest is 6 I have walls that I can paint (turns out pa
 int is pretty cheap - I never knew that!):

Turns out Dr. Seuss is amazing easy to paint! He used very simple shapes and designs, no shading, vivid colors... perfect for those of us with no artistic skill!
All you have to do is beg or borrow a projector, put the image you want on the computer - hook up the projector - trace it on with a pencil, then color in the lines.

Even I can color in the lines :)
I am particularly proud of it because it isn't gender or age specific. Right now we have a 6 year old girl and a 3 year old boy in the room. In a few months we will put the two boys in there (3 and 1).
Who knows how long we will live here but Seuss would work until they boys are 8 or 9ish - at which point I (or whoever lives here next) could just paint out the fish and put surf boards over the water :)
I realize that painting walls is not an option for everyone - but my next project is to put a few characters from the same book on their dresser, same process - project, trace, color in the lines!
I actually just used craft store paint for the fish - you know those tiny little bottles you get for buck twenty? so cheap - and pretty cute if I say so myself :)


sneak peak
Nobody has posted here for quite awhile, so I thought I'd give a little preview of what we've been working on for almost 2 months now - Adam is building a bunkbed for our kiddos. Our friend Aaron helped a lot. They started with raw lumber that was sanded and sanded and sanded. They went over Adam's design about 10 times and altered it here and there to make sure everything would work right. They cut the boards to the measurements and fit it all together and drilled the holes for the bolts.
It's now sitting on our patio in pieces while I take my turn with it - we went back and forth about staining it, and the final decision is that I'm painting it. Pink. Because my girls are 4 and 3, and they want a pink princess bed. Adam isn't very happy about it, but it's not his bed. He can get over it. I'm planning to get stencils to put a design on the sides, and I have little containers of paint in pastel shades of yellow, purple, blue, etc. I'm thinking flowers and hearts, and maybe little crowns. If I can't find a stencil like that to buy, I may try to make one because I definitely need a stencil. I'm not good at freehand art and I'm not going to use this as my first attempt at it.
It's taking awhile to do the paint because it's pretty cold out this week. Next week is supposed to warm up into the 60s, which is PERFECT painting weather. And we don't have anything scheduled during the day (unlike this week) so I should be able to get the pink done and do the stenciling.

10 November 2010
cupcake crafts
At Trina's request I am sharing my secret.

(The Polly Pockets on the far right were our wedding (cup)cake toppers. Since we got married right after Christmas this was the perfect way to display them!)
I love cupcakes. They're cute and delicious and individual-sized fun. As I surfed the net for some Christmas craft ideas I came across a few cupcake ornaments. Some I liked, some I didn't, but I ended up coming up with my very own. Behold: cuteness in a cup(cake wrapper).
The best part is they are SUPER EASY to make! All you need is: mini cupcake wrappers (Michael's), styrofoam balls (dollar store), and I had everything else on hand - scissors, seed beads, hot glue, tiny metal rings (left over from jewelry making), and ribbon.
- Use the scissors to hack up half of the ball so it isn't smooth anymore. Experiment with it a bit until you get a texture you like.
- Hot glue into a mini cupcake wrapper. A bit on the bottom and then all the way around. I was worried that my balls were too small, but once I started gluing they were exactly perfect.
- Use more hot glue to add beads, ribbons, and any other decorations. Glue on the metal ring to loop some ribbon through to hang, or just glue the ribbon right on top. Tada!
I'll probably be doing some more experimenting with these during the week - I'm curious what paint will do on the styrofoam, and I want to wander the dollar store and find other things to put on top - little berries or bells or bows. Super cute to put on the tree, attach to presents, and give away to friends while caroling! A sweet Christmas treat that won't go to your waistline.

(The Polly Pockets on the far right were our wedding (cup)cake toppers. Since we got married right after Christmas this was the perfect way to display them!)
11 October 2010
Homemade gifts - robes, skirts, dresses, & belts
I posted this on my blog, but figured it would fit into this blog too :) FYI - if you don't know how to make a pillowcase dress, there are TONS of directions and videos on youtube!
I was at Target early this week and saw some pillowcases and towels on clearance. That got the wheels turning in my head and I thought of all these different projects I could do with them for Christmas. If you know me, I cannot sew AT ALL - a straight line is about all I can accomplish. So these were all easy projects - none taking over an hour (which with a 2.5 month old, is important!!). I took me about 4 days to complete all of them....
I made them for Christmas - mostly for Sabrina (my 7 year old daughter)... She has been wanting dresses/skirts - so these came out cute and cheap! She is always wanting me to make her stuff, but unfortunately she was blessed with a mom severely lacking in sewing skills :P These should make her pretty happy and now I have a bunch of stuff ready for Christmas already :)
My FAVORITE thing I made is at the bottom, so make sure to check them out. I was REALLY impressed with myself for making them and coming up with it. I had no pattern, and couldn't find anything on the Internet that matched what I was wanting to make - so I winged it... and they turned out better than I hoped!! I also made 4 hair ties and a headband out of the leftover fabrics :) (didn't take pictures of them)

So these are the pillowcase dresses I made. The pillowcases at Target were REALLY nice (400+ tread count - really soft and silky). For 2 King size purple ones, it was $4.50, and 2 Queen size pink ones were $3.50. I went and bought some pretty sheer/pearl fabric to put over the pillowcases, to try and make it a bit fancier. I thought the fabric I chose was on sale for $2.99, but apparently I picked one that was $8.99! Yikes - I didn't notice until checking out... Luckily, the ladies at JoAnn's gave me a 50% off coupon making it $4.50 - so I decided not to return it...
So total cost for each one: $7.25
Purple one - $2.25 for pillowcase, $4.50 for the outer fabric, and $.50 for elastic at the top. Since this was a King size pillowcase and longer than I needed, I used the extra fabric for the ties and belt.. If I had gotten the right, on sale fabric, the total would have only been $5.75 :P
Pink one - $1.75 for pillowcase, $4.50 for outer fabric, $.50 for elastic, and $.50 for fabric for straps/belt.
There was also enough of the outer fabric for an extra belt (in pink one picture) for either dress
Now I just need to buy her a new pink and a white shirt to wear under them

 This is what I did with the other pillowcases (there were 2 in each set). I cut them in half and made skirts. Sabrina has been eying these skirts at Target that have a bunch of tulle on them - they are about $12 :P So these are what I came up with. One pink and one purple have 1 layer of tulle each and the other pink and purple each have 3 layers of tulle.
The purple ones came out to less than $6 for 2 ($3 each!) - $2.25 for the pillowcase, $2.38 for 2yds of tulle, $.50 for elastic, and $.79 for the belting to tie the waist
The pink ones were about $5.50 for the 2 - the same break down as the purple, only the pillowcases were only $1.75..
I think I am going to buy her some black leggings to wear under the pink ones...

 Belts - Sabrina has been asking for belts.. Why? I have no idea, but they are like $8-10 in the store, so I have yet to get her any. So when I was buying the stuff for the dresses/skirts, I found belting - I didn't even know they sold this (I told you NO sewing skills - I have no idea what they sell :P). So I bought some - apparently enough to make 6. and they were super EASY to make and way cheap! I ended up making 2 more, because Jonathan saw I was making them and said he wanted one too - so I went and bought some black belting and made him 2 :)
Cost: $2.05 a piece - belting was $1.99 a yard, I used .75 of a yard for each belt, plus had a 40% off coupon for the belting. The hardware was $2.29 and was enough for 2 belts (so $1.15 each belt).

 These are my favorite things I made. The kids have been asking for robes - mainly because Oliver got one as a gift and they think it is pretty cool. At the store they are at least $20, so I refused to get them their own. Well, when I saw the SUPER SOFT and FLUFFY towels on clearance at Target, I thought I could make them some. I could not find a pattern or anything online that matched what I wanted. So I figured it out myself and I am quite excited I was able to do it and they turned out so well!
So each towel was on clearance for $3.50. I bought 3 to complete the project (if you only wanted to make one, use one towel and one hand towel). S0 each robe used 1.5 towels coming to a total of $5.25 per robe (and they are REALLY soft, fluffy, and nice towels!).
Here is how I made them - in case anyone is interested - Super easy, cheap, and a cute gift:
Fold the towel in half and then half again; cut at an angle, thus making a circle in the middle of the towel (for the head)
Unfold the towel and fold it in half lengthwise and cut one side the towel to the hole (making the front opening of the robe)
Fold about a half an inch around the edges you just cut and sew around it (to make a nice edge and help with the fraying)
Take a hand towel (or if like me, cut a hand towel size piece from a bigger towel) and sew it to the head hole you made.
Then sew along the top of the hand towel (on the inside), making it into a hood
On the open sides, mine were about 30 inches long (each side). Make sure you turn inside out. I cut in about 4-5 inches with 10 inches at the top for the sleeves and 20 at the bottom. I sewed the bottom 20 inches together (4-5 inches from the edge), creating the side. I then just sewed the the bottom of the sleeves together to make them into sleeves (make sure to do this on the inside).
And you're done! Turn right side out and you've got a robe. I sewed on pockets because I had extra towel leftover and made belts out of the extra towel.
They are really cute and as you can see really easy! I know my kids are going to be so excited about them!
02 October 2010
another cookbook referral
We received this cookbook - Jacques Pepin's Kitchen: Encore With Claudine - for Christmas from Beth, who apparently found it at a used booksale or something like that. It's set up by menu - a main dish, a couple of sides, and a dessert. We had never heard of this chef but Adam was getting tired of menu planning for the grocery shopping so he decided to work his way through the book.
Success!
There have been a couple of things that we didn't really like - the cold cucumber and mint soup being the one that immediately comes to mind. But other than that, it's been great! We've been introduced to some interesting food combinations - tonight's dinner was zucchini mashed into a mashed potato gratin dish topped with poached cod and a basil sauce. The side was steamed leeks with bread crumbs over them, with garlic and Swiss cheese in the breading. It was really good!
And there's something else - until this week, neither of us had ever had leeks. Or turnips or parsnips. And now we have. Our kids won't go near most of this stuff but we're not pushing them hard on what they eat - they eat tons of fruit, vegetables, and sandwiches and very few treats so they're fine. They don't need to develop an adult palate overnight - some of these dishes have a pretty complex taste.
We're not even halfway through the book yet but like I said, everything (with just a couple of exceptions) has been surprisingly good - even combinations that sound a little weird. So I thought I'd pass on the book referral.
23 September 2010
binge and PURGE
13 years from when I graduated from high school to when I met Adam - the entire decade of my 20s plus a little extra. I cannot believe how many pictures I shot, and printed, and put in albums in those 13 years. I have 14 albums (I think), not including the hundreds of pictures in binder photo sleeves from my mission. I apparently saved Every. Single. Picture. that I took in those 13 years, including ones that are very dark, very distant and you can barely see the faces in them, out of focus ... you name it, it's in there. I'm dumbfounded at the amount of money all of this represents - 6 bucks for a roll of film, $8-12 for developing (depending on if I used 1-hour printing) ... and that was just for 24 shots. I have thousands of pictures.
And now I'm going to throw an awful lot of them in the recycle bin.
I recently found the Small Notebook blog, which I love. And it had these two posts this past week about dealing with a plethora of pictures, both digital and print.
Essential Tool to Organize Your Digital Photos
What to do with Boxes of Photos
And those posts got me brave enough to crack open the boxes that have been sitting under the stairs since my parents were here in May. One album from 1999-2000 was dated for a 9-month span and had over 500 pictures in it. Just that ONE album!!! Having the band Colors come to Oregon was really fun and a key moment in my life because it affected how I thought about myself ... but I don't need 50 pictures of that weekend. Really, I don't. A dozen will be just fine.
Sooooo ... I'm tackling the photo albums. I should take a picture of the pile of albums before I get too far into this project (I've gone through 2 of them), and then another of how many albums I have left when I get done rearranging everything. And a shot (which I will not print and stick in an album) of the pile of pictures that is getting dumped. So far, I'm just stacking them off to the side for the fun of seeing (and counting - about 250 so far) how many I'm getting rid of. Then I let SM attack them with her little scissors to cut me out of some of the shots to practice her cutting.
I'm doing pretty well at keeping the digital photos under control and I rarely print anything anymore (much to Adam's annoyance - the picture he has in his office of RG is when she was 18 months old and she's 3 now). But whoa. These boxes of albums. Crazy.
To be honest, this purging stems in part from this past spring, when I helped clean the house of an elderly couple when the husband died. The children all live out West in Idaho and Utah, and took the wife to live with one of them. Someone came out here and got their personal paperwork like geneology and journals and things like that, and the rest of the house was just left as is. The family asked someone in the ward to clean it out, dispose of everything, and get it ready to sell. I don't know what all happened with it because Jenna was born a couple of weeks later ... but I cleaned out ONE bathroom with FIVE full-size garbage bags. It was ... indescribable. And not in a good way.
So with my albums, I'm thinking - "What are my kids going to want to see when I'm dead? And what do I really truly want to haul all around the country as we move over the next 20-30 years?" And the answer is - Not nearly this much.
And now I will go through another album.
20 September 2010
the dangers of blog-hopping
What started with one little link off a friend's blog ended with hours of blog-hopping and dozens of tabs open with craft ideas. I'm a stay at home wife and not even pregnant yet, but I feel like I'm slacking. Yes, I paint and do artwork, but what about the millions of crafts that moms are supposed to do these days (and then faithfully put them on their picture perfect blog)? There are clothes to be refashioned, furniture to be refinished, and so many ribbons and ruffles to add to everything around the house. I don't own a sewing machine and I've never used (or even seen) Modge Podge. What sort of mother will I be?!
Of course, I did find small manageable projects that I would like to try out like cute little baby hats out of old t-shirts, no sew baby carrier slings, and tutus for my future ballerinas. But then I found the thing that made me think of Trina - I know how you hate boring walls, and the frustration of living in a rental that prevents you from painting. So instead, you can put up fabric wallpaper! (It's even found on one of your home improvement blogs, Trina - Apartment Therapy!) You just use starch and fabric and put it up like wallpaper and it comes right off when you're ready to move (or change your mind) without any damage to the walls!! OR, instead of an entire wall, you can do animals or shapes (or a castle for your princesses?) - since wall clings are all the rage these days. But instead of shelling out for some overpriced, not-exactly-what-you-want piece just make it yourself! Simply use the same method as the wallpaper, only on a much smaller scale, and it won't be nearly as daunting a task. This is something I'd like to try myself at some point, and thought I'd share the love. If any of YOU try it, let us know, and you can give tips and tricks to help us out.
Of course, I did find small manageable projects that I would like to try out like cute little baby hats out of old t-shirts, no sew baby carrier slings, and tutus for my future ballerinas. But then I found the thing that made me think of Trina - I know how you hate boring walls, and the frustration of living in a rental that prevents you from painting. So instead, you can put up fabric wallpaper! (It's even found on one of your home improvement blogs, Trina - Apartment Therapy!) You just use starch and fabric and put it up like wallpaper and it comes right off when you're ready to move (or change your mind) without any damage to the walls!! OR, instead of an entire wall, you can do animals or shapes (or a castle for your princesses?) - since wall clings are all the rage these days. But instead of shelling out for some overpriced, not-exactly-what-you-want piece just make it yourself! Simply use the same method as the wallpaper, only on a much smaller scale, and it won't be nearly as daunting a task. This is something I'd like to try myself at some point, and thought I'd share the love. If any of YOU try it, let us know, and you can give tips and tricks to help us out.
Subscribe to:
Posts (Atom)