31 December 2018

December journal

This month was the closest I came to no sewing at all. I've been working on a book project all fall - ghost-writing a memoir for someone else. The manuscript deadline was dropped on me out of nowhere, and I had only 10 days to get it done, reviewed, and submitted to the publisher. After being so completely furious that I cussed out the author for destroying Christmas for my family, I worked nonstop for a week (my kids ate a lot of store-bought pizza) until it was submitted at 1 a.m. on a Friday night. Mr. Author went with me to the school to pick up my kids that day, in the middle of our 15-hour marathon push to the end, and my 5-year-old wouldn't even look at him, much less give him a high-five. She had informed me that morning, "After today, I don't want you to work with him anymore, Mommy." Noted. 

So, with all of THAT, there went all my Christmas energy, any Christmas activities, and any Christmas sewing.

What I did instead was I took my DC map embroidery project with me on our Christmas break trip to Tennessee and Virginia, and worked on that while at my husband's sister's house. It was nice to have something productive to do instead of watching TV. I didn't quite finish the entire bottom section of the quilt, but I came awfully close! The whole project still has a LONG way to go and I doubt it will be finished in 2019, but I hope I can get a lot closer to that.   

And that concludes my 2018 year of sewing! I'm not going to do an entire review post like I have before, because I've done all the monthly journal posts. Just click on "review" in the index and you'll see my 2018 months all neatly in a row. I didn't finish any quilts this year, which is my one disappointment - I did want to do that. Other than that, I'm happy with what I did! 

For 2019, I have no new projects I'm adding - I still have a huge list I wrote out last summer that needs to be done! Mainly the four quilts for my kiddos. I have 5 kids, and I finished JE's quilt ages ago ... 2 years? I started on SM's quilt right away after that, but 2 years later, the pieced top is nowhere near being done. I'm making the Squared Away for JK. RG and TA are planned but nothing is started. It's way past time to get ALL my kids their quilts. I also have fabric that I bought to make myself a skirt AGES ago, seriously, I think 6 years ago. It's way past time to make that skirt too. 

30 November 2018

November journal

1. Loads of fabric pumpkins. I lost count, but there were more than 30.


2. Two more Squared Away quilt blocks - I did make two of this block, but when I went to take the picture, I realized I'd put one of them together wrong. Fortunately, I just need to take one of the side rows off to turn it around.


3. And it's not sewing, but I made my Christmas letter blocks ...


I'm excited to do a lot more sewing this month! I spent the summer traveling and doing theater and camps. This entire fall has been totally sucked up with editing a book. Ya know what? It's December tomorrow. I'm self-employed, and I don't work during Christmas! I'm doing service, and baking cookies, and sewing for my kids!

If anyone needs me, I'll be in the kitchen. See ya.

29 November 2018

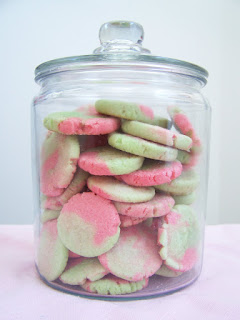
gimme some sugar!

Welcome, blog hoppers, to the Virtual Cookie Exchange hosted by Just Let Me Quilt! Thank you for including us, Carol! We are sisters who live at opposite ends of North America.

**********
MINDY
Christmas and crafting go together for me. I was just beginning my sewing adventures when I came across this tutorial for a tiered skirt.  I pulled out the small stack of Christmas fabric I had been given by my mother-in-law and tried it out.  Once I saw it on my toddler I was hooked!  Now, five Christmases later, I have started quilting along with making clothes for my two daughters, so many of my holiday gifts are made from fabric.


But this couldn't be a cookie exchange without some sugar!  Our family made tin-foil-covered plates of cookies to give to our friends and neighbors as we went caroling every year.  As we got older, and many of the siblings moved out, Emily was in charge of the peanut butter chocolate chip cookies and I made the sugar cookies.  

I now make these sugar cookies multiple times a year.  I play with food coloring, cookie cutters and cookie stamps.  I've made several cookie bouquets.  Last Christmas I painted them with dyed egg yolk.  And for Halloween I added crushed candies for a stained glass effect.  I've swapped out the vanilla for peppermint extract a few times, or even turned them into lemon or pumpkin sugar cookies.  This is just the best go-to sugar cookie recipe for soft, chewy cookies.


SUGAR COOKIES
Cream together 3/4 cup butter and 1 cup sugar.  Add 2 eggs and 1 teaspoon each of salt, vanilla and baking powder.  Stir until smooth.  Add 2 1/2 cups flour, one cup at a time, incorporating it fully before adding more.  Refrigerate the finished dough for 30-60 minutes before cutting into shapes, or immediately roll into balls and smash lightly to flatten.  Bake at 375 degrees for 8-10 minutes on a non-greased baking sheet.

  • You can freeze both dough or baked cookies.
  • When using food coloring, add it before the flour for even color.  To blend colors make two (or more) batches and then pick small pieces from each to roll out together.  Or you can add color to finished dough - it will be more saturated and will get all over your hands. 
  • To make egg yolk paint, simply add some food coloring (and water to thin it out if you'd like) to some egg yolk.  A little goes a long way, so one yolk can be used for multiple colors.  Paint on the cookies with a clean paintbrush before you bake them!
  • I used lollipops but jolly ranchers or other hard candies would work for the stained glass.  Crush it and use it to fill in the cut out shapes.  Bake as normal with parchment paper on the pan, but let it rest on the pan a few extra minutes afterwards to harden.

**********
TRINA
There's a back-story with the sugar cookie recipe. Because there's a bit of an age gap between us - I'm the oldest, and Mindy is the 7th of the 8 siblings in our family - it didn't occur to me until we were adults that the recipe story hadn't been shared until one day Mindy said something like, "I heard there's a story about this recipe and a shirt but I didn't know if it was true." Well, I do! Because I was there!

Once upon a time, Tawnia (#4 of 8) was about 2 years old and wearing a shirt with Cookie Monster and a bunch of words on it. Eric and I were 7 and 8, and it dawned on us that those words were a recipe. Did it really work? Was it a real recipe for Cookie Monster Sugar Cookies? So we asked our mom to try it. Tawnia was plunked up onto the counter, still wearing the shirt, while we read off the ingredients and measurements. And it worked! The best sugar cookies! We read it off the shirt at least a couple of times, usually while Tawnia was wearing it, before Mom got around to writing the recipe on a piece of paper. It has been our family's go-to cookie recipe for decades now, all because of a 2-year-old's shirt.

And now - seriously, just last week - I learn that it originally came from a book.

Trina's real-life, un-staged messy kitchen with sugar cookies. 
Bring on the frosting and the sprinkles! 

My go-to is three-ingredient fudge, which I first found on here on Made Everyday with these ingredients:


Chocolate mint is my FAVORITE. I wondered if it would also work with white chocolate and peppermint, so I tried my own variation.


Put all three ingredients - the both entire bags of chips (12 oz chocolate chips) and the full can of sweetened condensed milk - into a microwave-safe bowl and nuke it for a minute at a time for 3 minutes, until it's all soft enough to stir and blend together. Then spread it in a pan lined with parchment paper and let it set. That's it! Seriously!


YUM. If you get super-peppermint-y chips, I've actually had this turn pink in the past. Pink fudge is AWESOME!!! And it won me the Most Creative Dessert at our church's Christmas party a couple of years ago.


***********
Thanks for visiting - we'd love to hear where you're from in the comments. Please check in with the other blog hop participants as well!

November 27


November 28


November 29

Operation Domestic Goddess - YOU ARE HERE! 

28 November 2018

black friday boycott - craft day!

My sister-in-law and I had an awesome Black Friday! No shopping - we didn't even leave the house. Instead, we raided the bin of blocks that Adam made for the girls years ago that rarely get played with anymore, and played with mod podge, craft paper, and paint. I had some letter stickers for "Joy to the World" and little teeny wood letters for a bit of 3-D-ness on the "Happy Christmas" sign. That one needs to have a couple of holes drilled into it so I can loop craft wire through to hang it up.

My halls are a little more decked now ...


20 November 2018

plump purple pumpkins

I'm the Wednesday night activity leader for the 8 to 11-year-old girls at my church, and these kiddos love crafts! They're required to do a certain number of service projects for their award program, and I love it when we can combine the two. My partner Megan and I decided to have the girls make a craft to give to the elderly ladies in our congregation as a holiday gift for Thanksgiving, and we went with these fabric pumpkins.


I cut the fabric in a 9x18 rectangle - I bought a bunch of fat quarters at the fabric store and cut them in half. So quick. I also used fall-ish scrap fabric I have kicking around in my sewing area. I ran the side seam through my sewing machine so the girls would have time to make more rather than spending the whole evening on just one.

At the activity, the girls handstitched the bottom to pull them closed, stuffed them, and sewed the top closed. I have a lot of scrap felt that they used to make stems and leaves.


Each of the girls had time to make two - one to give and one to keep. They were SO excited to keep a fabric pumpkin, and they really were very cute. Both the girls and pumpkins.

The girls LOVED it so much that I sent all their moms the link so they could make more at home to keep for themselves. I was told later that a couple of them did.


When I got them home, some of them needed some extra stitching on the bottom because it wasn't tight enough. I did large side stitches with colored embroidery floss for the pumpkin "grooves." I also made more so our gift bags would have two each.


I loved the variety of colors they chose to put together.
 

I never got a picture of all of the pumpkins in one big pile because we started giving them away before we finished them all. We made more than thirty all together. If you have time tomorrow, or maybe for next year, they make a great little centerpiece or are fun to put on a shelf or windowsill! 

Happy Thanksgiving!

31 October 2018

October journal

- RG's Gryffindor robe. My only Halloween sewing this year, and she was Hermione of course.


- Letter Z for zig-zag stitching - my rope purse! It's actually kind of heavy because of the amount of rope, and I'm terrified the handles are going to rip right off if I put anything more in it besides my wallet and phone. They're only glued - it's too thick to sew.


It only took me an entire four years to do the Sew All 26 Challenge, but I have persevered and completed it!

- one 10-inch block for the Night Sky quilt, for the first time in months. I have the second section of the quilt top almost together - just a hole of 10 or 11 inches. I'm debating about another 10-inch block (there are already four in that section), or a group of 4-inch blocks.

20 October 2018

Z is for zig-zag

Four years and six days later ... I have FINALLY finished the Sew All 26 Challenge!! With lots and lots and lots and lots of zig-zag stitches. I ended up with this: a purse made of rope.


I got the idea for a rope tote bag from this post by SouleMama - second picture down. LOVE that. I didn't have enough rope to get quite that large, but still ended up here and I'm excited to use this! The bottom is 11 inches long, and the widest point of the curves is 14 inches. The height is 10 inches.

The curves are totally accidental but I like them a lot!


The handles were glued on with a whole lot of hot glue. My sewing machine will barely fit one layer of rope under the foot. No way I was even going to try with two layers.

The general idea when sewing with rope is to set a zig-zag stitch, and put two sections of rope right up against each other. You just keep turning and turning the piece until you get what you want - lots of people do bowls because they don't take much rope. I made some small rope bowls in 2015 - they hold random little things, and one is currently on JE's dresser to hold a bunch of hairbands.

For the Sew All 26 Challenge, I'm excited this is my grand finale!

19 October 2018

Happy Hogwarts Birthday

I'm no Pinterest junkie, so I kind of shocked Adam when I started working on a Harry Potter themed birthday party for RG ... who turned ELEVEN this month, so hello! Hogwarts party it is!! (When SM turned 11, that was sadly the year I decreed no parties at all. What was I thinking!?!? We'll have to make it up to her at her next birthday.)

There are many, many more elaborate ways to have a Harry Potter party. This would barely register for "party stylist" type people, but it was a pretty big deal for me. We spiced up our living room with a bit of Hogwarts Great Hall flair.


Crepe paper and disposable tablecloths on my friend Kelly's long tables did the trick. (The dollar store is my new favorite place for things that are just going to be thrown away. What took me so long?) I also printed out small House banners on cardstock, which were on either side of the fireplace.

The birthday girl greeted her guests in her brand new Gryffindor robes.


I used this tutorial, but made things more complicated for myself by putting right sides together in a couple of places. Meh. Just follow the directions as is, and fold in your raw edges to secure with a top-stitch. It would have gone a lot faster. If using 44-inch fabric for the wrist-to-wrist side so you can do the fold on a length of yardage, this is sized for kids. I don't think you could use this tutorial with the way the fabric is folded for adults. Two and a half yards is a good amount of fabric for a child somewhere around 4-foot-6. RG is 4'8". 

As the witches and wizards arrived, they each selected their own sorting hat.


There was a single color of M&Ms in each one to identify the House (red = Gryffindor, etc), and there was no way even for me to know who was choosing what after they were glued shut. It was fully a surprise for everyone in the room.


We had 12 guests, so there were three per house for our Harry Potter Trivia Challenge. RG wasn't allowed to be sorted/compete anyway because she would have answered every question ... so to stop that before it even started, I told her she could help moderate the competition. One of the Slytherin girls - by herself - beat all three other teams. I would have liked to have seen how she and RG stacked up against each other, but RG already knew the questions.

After Slytherin kicked butt in the trivia test, it was time to eat. Butterbeer cookies, double chocolate cauldrons, and Polyjuice potion. Recipes for the cookies and cake are at the links. The potion was Sprite, blue Hawaiian punch, and pineapple juice.


The chocolate cauldrons were AWESOME. This was definitely my favorite on how it turned out. I used the recipe for the cake, which had the thick and heavy consistency of brownies, and for the center cream filling. There's also a recipe for the outer chocolate frosting included, but I just bought that. The handles were made from Wilton's Candy Melt chocolate shaped with a plain round icing tip and "drawn" on parchment paper until it set.


After our sugared-up "feast," we sent them all downstairs to watch Harry Potter and the Sorcerer's Stone. As our guests left, their favor was a chocolate frog. I bought the mold on Amazon (watch the little spots for the eyes - I had to use my finger to press the melted chocolate all the way in), so there is a strong possibility of more Harry Potter celebrations in the future!

14 October 2018

The Narwhal Quilts

I haven't posted much all summer.  It was certainly busy, but I was sewing lots too.  I made progress on all four of the quilts I've been working on - all the blocks are done for the Christmas Cake Quilt, I've caught up on all but the very last of the Squared Away blocks, and I finally finished the two narwhal quilts. 


Both of my husband's siblings were expecting baby girls.  Taera was due October 11th and Nathan's was slated for September 29th.  Well Jade was born on the 29th, but she belongs to Taera.  Nathan's little girl Kinsley arrived on October 5th, which just happens to be Taera's oldest's birthday.  Miraculously I was able to finish the quilts AND get them to them within a week of each being born!  


I picked up this adorable fabric (Snowfall by Paula McGloin for Camelot Fabrics) when I won a giftcard to The Fabric Snob, an online Canadian fabric store.  It specializes in amazing knits, but I'm still scared of them, so I went for the fat quarter bundles I knew I'd use.  I narrowed it down to a few choices and let the parents make the final decision - and they both picked the same fabric.  Matching quilts for the twin cousins!


I originally saw this simple squared pattern here.  I played around with some math and made my own cutting diagram to get two squares out of each fat quarter, to use every inch of fabric I could.  The quilt top was fun and quick to put together.  The quilting took more time than everything else though!  But worth it.


This woven pattern though, was one hundred percent my own.  There was lots of sketching and math to figure out how to use as much of the fat quarters as I could.  I ended up with very few scraps.  It came together very easily, and I'm proud to say that all the corners match perfectly!


I need to work on my sandwich skills - the backs of both quilts are not nearly as pretty as the fronts.  It isn't bad for the number of different directions I had to sew in, but there are a lot of little puckers and tucks.  I don't have a large amount of space in my apartment, so I'm wanting to look into the board basting technique for the future.  I was just surprised by how well my binding turned out, since it is just the backing folded to the front.

It feels so good to have projects finished, freeing some room to start something new!  I've got four little girl dresses and a couple of ties to make for my sister's wedding, plus all the Christmas sewing.  Not sure I'll get that Christmas quilt finished this year, plus I've started collecting fabric for a second one!

30 September 2018

September journal

At the beginning of the month, I wanted to get back into my quilts after a crazy summer, and it's fall! It's quilt season! But there was a bunch of random stuff all over my sewing table, and all these unfinished little projects annoyed me. So that's what I started with.

1. Zip pouches for TA and JK - my last two girlies who didn't have their own bags. They chose the fabric forever ago and have been waiting so patiently, and I finally just sat down and made them. They were SO excited, and immediately put their markers in the bags. TA calls her's the "everything bag."

2. Squared Away quilt blocks: 4 pink (2 of each fabric set) and 2 aqua.


That's it. Didn't even take pictures of the zip bags. I meant to do a lot more, but I've been editing a book this month. I really want to get it done so I can get back to sewing!

31 August 2018

August journal

1. 60 feet of a pennant garland for camp


2. cross-body bag for my phone


3. an a-line denim skirt for SM


Now that I'm finally HOME for awhile, after a crazy-busy summer of being gone all the time, I can get back to more sewing. After I put my house back together. It's a wreck.

29 August 2018

school skirt

SM came across some glitter-infused denim about a year ago in the fabric piles, and there was just enough to make her a skirt. I used this tutorial on how to make a skirt pattern, but didn't bother with making a pattern - I just drew it straight onto the fabric.

There are no directions on making the skirt itself, so that got ... interesting ... I'm glad I already knew the basic idea of adding darts - there are four, two in the front and two in the back. I had to wing it on adding the facing. This was so I didn't lose 2 inches of fabric on the top from folding over to add a waistband, and also because that fabric would itch if the glitter side was against her skin. I just lost the teeniest seam allowance.


This is only the 2nd zipper I've added in clothing - the first time I put it on, it was twisted so I had to remove the whole thing and do it again. It still isn't as "invisible" as it should be because I didn't put the seams in tight enough, so there is a slash of mint down her hip ... it's a design feature, not a mistake. And I barely did a hem, also to maintain as much skirt length as possible - bias tape beneath.


Makes me laugh that the inside is all colored and detailed more than the outside. I wasn't aiming for a mini-skirt but it is a couple of inches above her knee. Siiiiiigh. She's getting too tall. I made her put on cut-off leggings underneath, because it went halfway up her thigh when she sat down.


And here she is, ready for 7th grade!