30 December 2016

MY FIRST QUILT!!!

It has taken me a looooong time to do this, mostly because I kept setting it aside to work on other projects ... but IT'S DONE! This is my first quilt that I've done EVERYTHING on! All the piecing, the borders, the quilting, and the binding.

I've heard the pattern called hobo rails or rail fence. It's sets of 3 strips alternating directions. I quilted it diagonally across the squares and it completely changed the look of the whole thing. I'm totally excited about it - I actually made a whole twin-sized quilt!

When I first finished the top ... a year ago ... I've worked on a lot of other things since then before getting back to it.

DONE! With giggly helpers not quite holding it up the way I'd like ... but oh well.

JE wrapped up in her new quilt - warm and cozy for winter!


QUILT STATS
Pattern: rail fence
Blocks: strips of 6.5 x 2.5 inches sewn into sets of 3. 
Fabric: every random pink I had in my sewing room, some given to me from my quilt group. Scraps from making clothing were included. The border was bought at Hobby Lobby.

TITLE: The Pink Babies
The story is that when we had just had our first baby and she was about a month old, we went to a church function. Another couple also had a baby there. Someone was asking about us, and to distinguish us from the everyone else, we were referred to as "the ones with the pink baby." Adam had gone a little crazy with acquiring pink clothes for SM, so as we added more girls to our family, they were always dressed entirely in pink as newborns. So it stuck. We had the pink babies.

It just seemed appropriate that my first quilt would be all pink, and I'd name it The Pink Babies. The girls aren't so happy about that because *huffy sigh* they are not. babies. anymore. But it is what it is. And I love it.

29 December 2016

M is for Mommy Made It

For Christmas a couple of years ago, Adam had Mindy design me a little logo label for the clothes I make for the girls, which says "Mommy Made It." Apparently, he was asking one of the girls about her outfit one day, and the response was, "Mommy made it."


This fall/winter, SM needed a new church dress anyway and she wanted one with long sleeves. I told her to go through my patterns and she chose the Book Report Dress from Oliver + S. She wanted it to be red and gold for Christmas but something that she could wear all winter and we landed on this at Hobby Lobby.

There are a number of smaller details like pleats, cuffs, and pockets along the waist that blend in to the whole look because I made it in one fabric, rather than using different fabrics for the various pieces. This is a size 10, lengthened by about 5 inches. Probably should have made a 12 - I think she's only going to get one season to wear this.

28 December 2016

2016 Sewing Review / 2017 Plans

2016 Completed Sewing Projects
  • reusable Christmas drawstring bag
  • hemming or repairing x22
2017 Goals
I didn't have a goal list for 2016 and still got a lot done, but it is nice to have a checklist to look at at the end of the year.  As a disclaimer: I'm not sure how creatively productive my 2017 will be - I've got my second baby due in February, but then Cupcake will be starting Kindergarten in the fall.  And after years and years of drawing, sewing has become my creative-outlet of choice, but I would like to make more of an effort to draw along with my sewing.
  • Complete the Sew All 26 Challenge.  I know we never set a deadline, but I only have 6 letters left!  And I already have a plan for the letter Z - a zipper pouch made entirely of zippers!
  • ironing board cover - in our small apartment (and about to feel a lot smaller) I've been using a wooden TV tray with a towel on top as my makeshift ironing board.  Time to upgrade a bit and make a decent cover for the tray for future use.
  • camera case - nothing fancy or big, but it would be nice to keep my camera more protected when I carry it in my purse.
  • Flannel Rag quilt - I spent a day getting all the squares cut out, it's just waiting to get put together.  A February deadline would be smart!
  • baby girl dresses - not only do I have a new baby girl on the way, but I have two friends due with girls as well.  It is smart sewing to make things in batches, so if I'm making one dress, why not make three?  And handmade gifts are always appreciated.
  • Maggie Mae and Glass Onion tops - I bought these patterns last year and haven't had the chance to make them yet.  And I have purple sheep fabric that Cupcake is begging me to use.
  • denim purse - a friend gave me a LOT of squares for my I-Spy quilt (after I inspired her to make her own) and requested that I make her a bag (like one I had made myself) in return.  
  • more quilting - there's a stack of white squares ready for a baby I-Spy quilt; I want to do more string quilting; maybe learn paper piecing; and I've got a jelly roll waiting to be used as well.

Quilts

Instead of trying to go back and catch up with all the posts I haven't done, I'm moving on.  Time to post my two biggest project of the year: my first two quilts!

I was given a single strip of the animal print a few years ago, and knew I wanted to make a baby strip quilt from it.  After finding out my next baby will be a girl, I was inspired.  It was very simple to put together, which was perfect for my very first quilt.  I learned quickly that I needed a walking foot, and only had to visit three different stores to find someone that could help me (since my machine is rather old, but simple).  I used basting spray for the sandwich - a bit expensive but a huge time saver (and I don't have basting pins), and I had enough left for my second quilt (possibly a third if it is small).  It isn't perfect, but I learned a lot, and look forward to doing more complicated projects in the future.


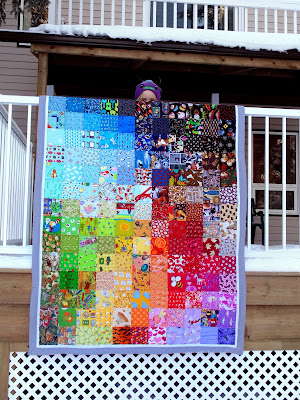
I had been planning on this I-Spy quilt for almost a year - it can take a long time to gather so many different fabrics!!  The first squares were purchased back in February (a charm pack of 40 5-inch squares) but I was given so many more from generous quilting friends.  I still have a small stash left, including a stack of white squares for a future baby version.   
The assembly was pretty straight forward - sew the squares into rows and then sew the rows together.  Big lesson learned: I should have taken more time to work on the placement - there are a few square that irk me, but there's nothing I can do about it now!  I used a grey sheet for the backing (grey is one of Cupcake's favorite colors because of her Grey Sheepy and it was a good neutral color), and kept it easy on myself and folded it over for the binding as well - machine stitching the binding was so much faster than hand stitching!   
I'm pretty happy with my first two quilts!  The first was an oversized baby quilt, and the second was a bit undersized for a traditional twin - and still hard to heft on the sewing machine, so I doubt I'll make anything bigger than a twin size for a long while.  There is lots to learn and many different techniques that I want to try - here's to more quilting fun in the future!

27 December 2016

M is for mending box

I don't have a picture of it ... but I finally emptied my mending box. It's been piling up for literally a couple of years and I finally got tired enough of it to deal with it. Here are my stats:

Mended, back into circulation - 33

Need to be mended since then, and now sitting on the table - 4. Since I don't have a mending box anymore, I'm doing much better at just dealing with things as they come up.

Removed from the mending box and just put into donations - about 12. Most of these were shirts I was going to make into t-shirt dresses but are now outgrown by everyone, including JK. Oops.

Items still waiting for alterations into other items - 7. These are pants into shorts, and dresses into skirts. Lower priority, since the new clothes are for warmer weather.

19 October 2016

L is for lanyards ... lots and lots of lanyards

This is a way-overdue post ... I did L during the summer but couldn't post it until I finished J and K first! K was done kind of at the same time as L, but it took until now (the fall) to backtrack to J.

L is for lots and lots of lanyards. Sixty, in fact. This was my main sewing project for the Activity Days/Faith in God day camp I put together for this summer. Yes, I made every last one myself. I worked on them off-and-on in May and June, but once I had my registration numbers, I really cranked them out in July. I finished the last ones the night before camp started.

Adult leaders: sunflowers, teen junior counselors: the purple/cream in the middle, 11 year olds: green, 10 year olds: purple, 9 year olds: blue, 8 year olds: pink.

I came across this Noodlehead post last winter and instantly decided to make all the lanyards for the name badges instead of buying them. I had some fabric contributed by a friend but most of this was what I had sitting around in my storage room - nothing was purchased except the clips on the ends. There aren't precise directions for the lanyards that I could find, so this is what I did:

1. Cut a strip of fabric 36 inches long and 2 inches wide. This length works for both kids and adults.

2. Press the two edges in just barely, like with bias tape.

3. Fold it in half and press again, so the raw edges are tucked inside. OR, as Mindy pointed out, use a bias-tape maker for all of that. I did try that but wasn't figuring out the bias tape maker, so I did it the longer way.

4. Sew it closed, as close to the edge as possible.

5. Sew it down the folded side as well along the edge, so it matches.

6. Put the ends together, fold over the raw-edge end so it's tucked in, then wrap around the ring on your clip before sewing. I went back and forth about 3 times to make sure it was secure. The ring/clip combos were ordered on Amazon.

One of the lanyards in action, on my own kiddo, when they were decorating cookies and cupcakes to give to the Hartford Temple construction workers.

Additionally, to go on the lanyards, I put together four different clips with felt on alligator clips, to go with the Faith in God sections. The overall theme of the camp was "Stand Tall" and we had a devotional each morning of the camp to go with the three sections of the Faith in God book. I had a lot of help making the clips - I made the yellow triangles with the teeny orange feet myself. I didn't touch the hearts or the flowers - the sister missionaries, a friend, and SM spent an entire afternoon at my craft table getting them all knocked out. I split the temples with the friend. We made about 50 of each clip - we had 30 girls, 6 teen junior counselors, and 17 adult leaders working on various sections of the camp. The clips had narrow grosgrain ribbon hot-glued to the clip, then the felt shape glued onto that - the ribbon helps hold the felt to the clip better (and yes, in the past when making hair clips for my girls, I've left the ribbon off. Mistake.)

Our camp theme: Stand Tall. CLIP: yellow felt triangle, orange cardstock cut with a baby foot punch from the scrapbook section at Hobby Lobby. The Stand Tall/feet theme came from the January 2016 Friend Magazine.

Learning and Living the Gospel - in addition to the devotional, we had an outing to the Hartford Temple. CLIP: Light blue 2x1 rectangle, white felt cut in the temple shape, yellow ribbon at the top, green scrap across the bottom, glitter over the whole thing.

Service - we decorated cookies and cupcakes, and took 90 treats and thank you cards to the construction workers working on the Hartford Temple. CLIP: red or pink felt cut into heart shapes of various sizes, ribbon and lace added with hot glue - just various things from my scrap box.

Developing Talents - as we develop our talents, we become more beautiful like flowers do. CLIP: I've been making this style of felt rose for a long time - here's the tutorial. The flowers were then glued to a wonky random-cut green triangle for the leaves, then glued to the clip.

This day camp was a test run to see if this is something our church group will do regularly. There was an overwhelming positive response from the girls who participated as well as their parents, so we're going to the region level next year. It's been requested that I do the felt clips again, and I should probably spend the winter making another 100+ lanyards!

18 October 2016

K is for knit fabric

Before I did J, I did K.

In sewing so far, knit fabric and I have not gotten along particularly well. Back at Letter D - doll clothes - my pieces with knit fabric were totally wonky and did not go well. It may have been the fabric itself. I was using old knit leggings for the fabric instead of a fresh cut that hadn't been used before. Either way, it made me skittish to use it again so I haven't, until now.

In July, I needed a skirt that was solid-colored and drapey, really fast for the play. After the toga project, I had about 4 hours before the dress rehearsal to take care of my own costume. I hadn't found anything at the thrift store that I liked, and I remembered this blue knit. Sure, whatever. It's a solid, which is what I needed. I went slowly while sewing to make sure I didn't stretch and warp the hem, and used a zig-zag stitch to allow for the give in the fabric. And I guess it worked! I did just an elastic waistband because it's easiest, and then tied a sash around my waist to cover it.

It's a bad photo because it was shot from the auditorium with an iphone by a 4-year-old. But you get the idea, and here I am telling Professor Hill what a trashy girl Marian the Librarian is. (The girl in the shorts behind me was getting her skirt fixed backstage - this was dress rehearsal. She would have been quite scandalous in 1912 wearing only that!)

17 October 2016

J is for jeans

I've been accumulating old jeans in a pile for YEARS with the intention of cutting them up and making a picnic blanket. I'm finally working on it.

It occurred to me that making a picnic blanket out of jeans as large as I want would be REALLY REALLY heavy, and possibly even damage my washing machine when putting it in the laundry. So Plan B is that I'm making 48x48 inch jeans quilts, and then I'll put them all next to each other. Voila! My 8-foot by 8-foot blanket, just in four pieces!

One down, 3 to go!


The back is an apple print on a navy blue background - it came from someone else's clean-out that ended up at my house. Very vintage-y, probably from the 80s. I have no idea, but certainly not current. It works for a picnic blanket.


It's a little wonky (bottom right corner) - obviously I need work on my squaring off, but this is only the 2nd time I've tried this. And who cares. It's a picnic blanket to sit on the ground.

close-up of the apple print

07 September 2016

I made something for ME!


I made myself a shirt!  I bought the kid version of this blouse months ago (the Glass Onion by Shwin Designs), and even though I still haven't sewn it up, as soon as they came out with the adult version (the Glass Petal) I bought it and made one for me!  A little tricky to put together, but they provided a video for the hard part.  It fits really well, except the sleeves were much too tight. So I got really brave and modified them!

Following this tutorial, I made tulip sleeves to give me more movement.  And, bonus, they mimic the back of the shirt!  The first time I put one in it was backwards, but I got it all figured out and now I have a fabulous new shirt.  I've got plans for at least one more with a few tweaks to my new sleeve pattern and a little bit of added length to cover my growing belly better.

29 August 2016

shirt and shorts: sleep sets


Two identical pairs of pajamas - but it took me two months to finally get around to finishing the second pair.  I used the same pattern as the nightgowns I made earlier this year, and just traced off some of her current pajama pants.  It took about an hour per piece (top and bottom).  She LOVES her sheepy pajamas (since she love all things sheep), but the floral ones are equally as comfy.  

S is for Stencil

I made three (more) reusable grocery bags back in April.  Two for Tawnia, and another one for me.  I had just discovered freezer paper stencils, so I had to try it out.  (For a complete tutorial you can find one here.)  I have tried painting on fabric before, and this is the best method I have found so far to get clean lines and enough layers of paint on so it won't fade.


My favorite was the mermaid one (I found the original image on Pinterest and free-handed it).  A bold graphic that came together really quickly.  The aunt quote is fabulous BUT it took for. ever. to cut out all the letters.  Worth it, because Tawnia uses it all the time and loves it.  Tawnia also requested some flowers - and her favorites are lilacs.  I didn't stencil those at all, just had fun with a paintbrush, but I stenciled the butterflies afterwards.

Grey Sheepy shirt for a sheepy 4th birthday party!


 I actually made this shirt and stenciled it back in April.  I was going to use it to surprise my brother and sisters when I visited them.  But right before the trip I miscarried and had to put the shirt away.  Funny enough, when my sister came to visit at the beginning of August, I was able to pull out the shirt again to make our announcement to her!

08 August 2016

I is for INSANE!!!!

So the three older girls and I just wrapped up with a community theater production of "The Music Man" - the girls were in the junior chorus, and I was one of the pick-a-little ladies. About 10 days before the show was scheduled, I asked the producer what we were going to do about the toga costumes for the Grecian Urn sequence ... she didn't know ... I figured it out ... and suddenly I'm charged with making ten togas in a week ... I don't think that's quite what I was offering, but there you go. And glory be - I pulled it off! Just in time for the dress rehearsal! For real. Dress rehearsal was Wednesday. I finished the last one around midnight on Tuesday night.


I used this tutorial for a pillowcase dress, although ours obviously were for adults. My original measurement for the two rectangles of fabric was 36x60 inches, and we adjusted from there. A couple of the ladies needed it wider, a couple more narrow, and some needed to be hemmed a lot more than others - but that was the starting point. For the fabric, I went to Walmart and got the cheapest white top sheets I could find in the bedding section - a twin was 5 bucks and I could get three togas out of two sheets, depending on the measurements. I used a 1-1/2 inch satiny ribbon for the shoulders - a couple of years ago, I got huge spools of ribbon from clearance in the gift wrap section after Christmas and they were still just sitting there. This was a good use of it. That was pretty much it - it just took a lot of time because I had to do them all really fast, and there were so many! I did get some help from a couple of people, which I very much appreciated because at the same time, Adam has been sick all month and we were trying to put up blueberries (frozen) and cucumbers (pickles) (not combined) from the summer harvest.

Anyway, the togas. The insane number of togas:

 "Aaaand a fountain!"

"Triiiiickle trickle trickle trickle!"

03 August 2016

H is for hatinator

My hat for "The Music Man" ...


Th original hat was in a box of random hats, and this was the only one that fit my head over my hair ... but it was too big, and the brim was too floppy. So I cut the dome and settled the top down into it further - you can kind of see the line on the top left in the picture. The stitching was really obvious so I knew I had to cover it with something ... obviously I went with lace. I also cut about a half inch off the brim and that helped A LOT. I originally wanted to get a feather boa and just wind it all around but I never made it to the store to get one. When I was doing the lace, I also pulled out the tulle, thinking I'd make some kind of bow but fortunately (because this was about 3 hours before the dress rehearsal), inspiration struck and I just twisted a long strip of tulle around and around and fluffed it up. Except for the stitching on the dome, the whole thing was done with a heck of a lot of glue in my hot glue gun.

And here we are!!

The hat in action! On stage, I was the Pick-a-little soloist ... "Just melt her down and you'll reveal a lump of lead as cold as steel ..."

And with three of my girls in "Wells Fargo" ...

P.S. This type of big foofy hat, in England anyway, is actually called a Hatinator. Here, we just call it a Kentucky Derby Hat. HA!