21 June 2010

dessert pizza

Sugar cookie crust - you can use your own sugar cookie recipe, but here's mine:
3/4 cup of butter
1 cup of sugar
2 eggs
1 tsp salt
1 tsp vanilla
1 tsp baking powder
2 1/2 cups flour

The usual recipe says ungreased cookie sheet, but if you are making one giant cookie, it's best to lightly grease it if you want to take it off the pan before serving. Bake for about 10 minutes at 375 degrees.

Frosting - mix 8 ounces of cream cheese with 1/2 cup of powdered sugar and 1 tablespoon of lemon juice. We only had regular sugar, and it worked just fine. Spread across the cookie when it has completely cooled.

Top with various kinds of fruit. We used strawberries, kiwi, mango and dragonfruit. Cut like serve like a pizza, and enjoy!

18 June 2010

inventory

First of all, April - where's a picture of the headboard? The nightstand looks great!

Mindy - yes, rearranging and organizing your spice rack is a worthy post. Very creative of you to use a cereal box and scrapbook paper! Even more creative than using scrap wood and a power saw, if you ask me.

And speaking of organization, I've been having some related entertainment at this end of the pipeline. When my parents came to Mississippi for Jenna's baby blessing, they brought all of my stuff that had been sitting in their storage room for the past 7 years. (For the first time in 6 years of marriage, all of our stuff is in our own house instead of scattered about the country in various storage rooms.) I thought it was mostly books, and it was ... if you count 4 large boxes of just scrapbooks and photo albums. There were a bunch of knick-knacks like my travel souvenirs (my boomerang from Australia, for example) and a number of things that I'd forgotten about, as well as my collection of picture frames and carousel horses. I need more shelves before I can even unpack a lot of it, so I'm back to boxes stashed in corners. *sigh* I hate having our bedroom as a landfill, but most things have to get stashed there so Summer and Marnie stay out of it.

I also had:

~ a 2-inch binder full of just wedding announcements. That's it. I don't even remember a lot of these people. I'll pull out a few of them, like if I introduced the couple and/or was in the wedding. But the rest are getting dumped.
~3 or 4 t-shirts with signatures all over them. Again, don't remember anyone specific. Those will be painting shirts for Summer and Marnie now, until they're completely thrashed and then they'll get tossed.
~ beat-up ribbons and silk flowers from corsages from ... somebody's weddings. And maybe senior prom? I think? Gone. I have pictures.
~ the little black velvet boxes that Adam's and my wedding rings came in. Really?

What on earth was I thinking with saving some of this stuff? At least I didn't still have a 6-inch stack of newspaper clippings of the 1991-92 Portland Trail Blazers. I did find that in my stash when I got home from my mission. I went through it, remembered games that Eric and I spent screaming at the TV, laughed, and threw it all away.

Moral of the story - I'm still a packrat but I'm definitely learning to purge.

spice shelves

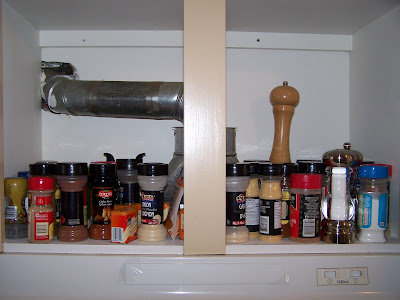
I'd been wanting to do this for a while, and an enrichment activity at church was the final push in the right direction. We have a small cupboard above the stove the holds all our spices. And we have a fair amount of spices. It's always difficult to find what we're looking for up there, so I figured some little shelves were needed. If this were any other crafty blog, I'd be expected to whip out some scrap wood, my power saw, and a few coats of paint. But what I did was fast, easy, free, and only used a pair of scissors, packing tape, and a cereal box. That's worthy of this blog, right?

BEFORE

AFTER

I was planning on doing it slightly different than it appears, but Aaron had to add his two cents and reinforce and all that manly stuff. It's mainly his spices, so I guess that's alright. I also rearranged my living room and reorganized my linen closet/bathroom storage.

17 June 2010

"new" bedroom set

Like the new theme of this blog! Here's a project I did recently and I copied the post I did about it to here.

Most of our tax refund this year was used to get our "new" car and to help us move this summer. It's dang expensive to move to the San Fran Bay area!

Anyway, I've been wanting a bedroom set for a loooonng time and decided to use a little bit of our refund to get one. We've never had a headboard and our nightstands were literally falling apart. So, I started my research and hunt. New furniture was out of the question (I saw a set that I liked for around $900 and that was at the cheap end).

I wanted real wood and not some plywood thing from Target. So, I researched how to refinish furniture and started hunting at Salvation Army, Goodwill and on Craigslist. And I did it!

I found two of these nightstands in great structural shape, but with the finish beat-up and chipping. I sanded off the old varnish, smoothed out the scratches and stained and resealed them.


I also found a headboard that was in pretty good shape and shined it up with some Old English oil. The headboard and nightstands are both this dark cherry stain.


After

Not the best lighting for the after picture, but it's good enough. I was in a hurry to get it set up in our room :) I love dark cherry finish, though I know it's not for everyone :) I feel pretty proud of myself for getting it done while living in an apartment and only having a patio (with no wind protection) to work on.

Cost of project: Nightstands (2) = $30, Headboard =$25, stain=$14, sealer=$12, spray paint for knobs =$4, Other (sandpaper, gloves, brushes, rags, etc) = $25

Total Cost = approx $110 for a "new" bedroom set! We're happy with it and hope it makes it through the move without getting too damaged :)

CHANGES!

Yes, this is the same blog. Just changed. And let's expand it.

Adam and I have been calling my venture into homemaking "Operation Domestic Goddess" since I quit my office job when Summer was born. I was that un-domestic, as a number of you know. I've got the cooking down fairly well now, for the most part. I've been looking into branching out into other things (but haven't yet, to be honest) ... and played around with starting another blog. And then - duh - I'll just expand this one to be more than recipes. I don't need another blog. Posts on this one are sporadic enough as it is, and we've been doing this for 18 months now. Time for a shake-up.

The inspiration to learn to sew - I can't believe I just said that - comes from this blog: Made by Dana. I'll list it with some other links in the sidebar. I don't remember how I came across it, but as soon as I started looking through her posts, I thought, "If I decide to learn to sew, it will be because of this blog." And here I am. I'm just floored by all the stuff on it. I want. Isn't that how it is with everything? I didn't learn to cook until I wanted to eat good food and cared enough to learn to make it myself. And now here I am with sewing - I want these things because I think they look awesome, so I will learn to make them. Beth, aren't you SO PROUD of me?

This morning, a couple of friends were talking about making hairbows for their new baby girls (Jenna was one of three born in April), and I want to learn how to do them. So we decided to do a group gathering for everyone to work on their own projects, help each other, and just keep everyone motivated.

So keep posting recipes, and now let's post about other things you're doing around your house too. 

09 June 2010

Potato Salad

So, I was blog surfing, and came across this contest at RoudyStroudy. Basically, she is calling for all potato salad recipes so that she can make them and try them.

So, here is my recipe!

Potato Salad

8 medium potatoes, boiled peeled and cubed
8 boiled eggs, diced
1 meduim onion, diced
2 regular sized dill pickles, diced
1 c. miracle whip
1/4 c. mustard
salt and pepper to taste

Basically just mix all of these ingredients and you get this:


You can eat is as soon as you are done, or you can wait a day. We always think it is better the next day when we have the leftovers! :)

08 June 2010

Braised Soy-Ginger Chicken and Bok Choy

This recipe is primarily for grilling, but making some variation on the sauce and then marinading the chicken in it, then cooking it in a wok, taking the chicken out, reducing the sauce and so forth, would work well.

Ingredients:

1 1/2 cups water
1 cup soy sauce
1/4 cup rice wine or dry sherry
2 Tbs firmly packed brown sugar
1/2 tsp. Chinese five-spice powder
2 Tbs. minced fresh ginger
3 green onions, thinly sliced
2 lb. bone-in, skin-on chicken thighs or breast halves
1/2 lb. bok choy, quartered lengthwise
2 Tbs honey
1 Tbs Asian sesame oil
Steamed rice for serving
Recipe:

Other leafy greens, such as Swiss chard, kale or spinach, maybe used in place of the bok choy. Chop the leaves coarsely and cook just until tender. The spinach will need to cook for only a few seconds.

Preheat a grill to high heat (I would just modify this to cook on the stove top or broiler)

Set a Dutch oven or deep fry pan on the grill. Combine the water, soy sauce, wine, brown sugar, five-spice powder, ginger and green onions in the pot. bring to a boil, then reduce the grill temperature to medium heat. Submerge the chicken pieces, skin side up, in the liquid and simmer gentle for 8 minutes. Turn the pieces over and continue to simmer until the chicken is opaque throughout when tested with the tip of a knife, about 8 minutes more.

Using tongs or a slotted spoon, transfer the chicken to a platter and cover with aluminum foil. bring the braising liquid to a boil, add the bok choy and cook until tender, about 3 minutes. using tongs or a slotted spoon, transfer the bok choy to the platter.

Return the braising liquid to a boil and boil until reduced by half, about 5 minutes. Stir in the honey and sesame oil. Move the pot to the side of the grill. Place the chicken on the grill, brush with braising liquid and grill for about 2 minutes per side. Arrange the chicken on top of the bok choy on the platter. Pour any remaining braising liquid over the chicken and bok choy and serve with steamed rice.

Serves 4

06 June 2010

Caesar Salad Dressing

My husband ate his very first salad EVER this year with this dressing. It's yummy!

1 clove garlic, minced
1 Tbsp lemon juice
3 Tbsp Balsamic vinegar
1 Tbsp Dijon mustard
1 egg yolk
1/2 tsp Worcestershire sauce
1/2 C grated Parmesan cheese
1 C olive oil

Put everything except Parmesan cheese in a food processor and blend until homogenous. Add olive oil a little at a time, continuing to blend. Add the cheese, then blend just enough to mix it in. If the dressing is too thick, blend in a little warm water to achieve the desired consistency. Serve over Romaine lettuce, croutons, and fresh grated Parmesan [the best part of the whole deal!].

This dressing will keep for a week sealed in the refrigerator. Makes about 6 servings.